Print | posted on Tuesday, May 6, 2008 2:00 AM
The default behaviour of the Boot Configuration and Boot Loader in Vista and Windows Server 2008 is that the Windows OS last installed becomes the default. Whilst this can be modified using tools such as BCDEdit we will install Windows Server 2008 next to avoid that unnecessary additional configuration.
- Insert the Windows Server 2008 x64 DVD into your Mac.
- From the Apple menu choose Restart... and click Restart.
- Hold down the ALT/OPTION key while the machine boots.
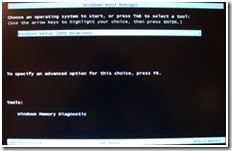
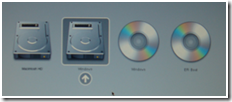
- When the Boot Picker screen appears, select the CD ROM icon labelled Windows and wait while the Windows Boot Manager loads (do not select EFI Boot).

Note: the Boot Picker may take a little while to load whilst the supposed EFI support in Windows confuses the Mac.
- When the Windows Boot Manager loads press Enter and wait while the Windows Installer loads.
- On the Install Windows page, select the Language and Regional Settings you need and click Next followed by Install now.
- Select the Edition of Windows Server 2008 you need and click Next.
- Check the I accept the license terms check box and click Next.
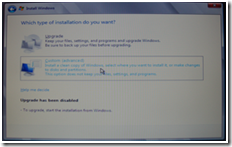
- Click the Custom (advanced) button.
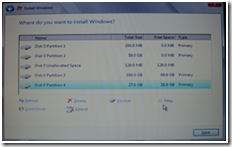
- On the Where do you want to Install Windows page select the Partition labelled VISTA and click the Drive options (advanced) link.
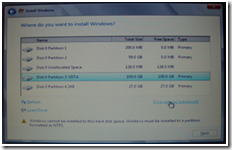
Note: we format the Vista partition now to save some time later.
- Click the Format link and when prompted click OK.
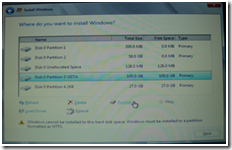

- On the Where do you want to Install Windows page select the Partition labelled 2K8 and click the Format link. When prompted click OK.
- Ensure the 2K8 partition (whose label has been removed, Disk 0 Partition 4) is still selected and click Next.
- Wait while Windows is installed. After approximately ten minutes Windows will restart. Hold down the ALT/OPTION key while the machine boots.
- When the Boot Picker screen appears, select the Hard Disk icon labelled Windows and wait while the Windows loads.
- The Installing Windows page will re-appear at the stage, Completing installation. After approximately five minutes Windows will restart. Hold down the ALT/OPTION key while the machine boots.
- When the Boot Picker screen appears, select the Hard Disk icon labelled Windows and wait while the Windows loads.
- Click OK and enter a Password for the Administrator Account. Click OK.
- When the Desktop appears close the Initial Configuration Tasks Window.
- When the Server Manager appears, close it.
- From the Start Menu, choose Computer.
- Select the DVD Drive and click the Eject button.
- Insert the Mac OS Install Disk 1 (or your Boot Camp Drivers Disk) into your Mac.
- When the AutoPlay window appears, click Run setup.exe.
- On the Welcome to the Boot Camp installer page, click Next.
- Select the I accept the terms in the license agreement radio button and click Next.
- On the Choose additional features and settings page, ensure the Apple Software Update for Windows check box is checked and click Install.
- Wait while Boot Camp and Drivers are installed.
- On the Boot Camp installer completed page click Finish and then Yes to restart the computer.
- Hold down the ALT/OPTION key while the machine boots.
- When the Boot Picker screen appears, select the Hard Disk icon labelled Windows and wait while the Windows loads.
- Logon to Windows. Notice that all the drivers are loaded and the screen resolution is set to something a little more sensible. The Boot Camp help file will also load and the Boot Camp Control Panel icon is displayed in the system tray.
- Eject the Mac OS Install CD.
- Configure Boot Camp to Use the F1-F12 keys to control software features using the Boot Camp Control Panel.
- Rename the C:\ drive to Windows 2008.
At this stage the Windows 2008 installation is complete and you could choose to install your other apps, run Windows Update or restore from a backup your data etc. For the purposes of brevity we won’t bother and will carry on setting up our final partition.
Continue to Part Four: Installing Windows Vista and Drivers