Print | posted on Tuesday, May 6, 2008 2:08 AM
- Insert the Windows Vista including SP1 x64 DVD into your Mac.
- From the Start Menu choose Restart... enter a period in the comment text box and click OK.
- Hold down the ALT/OPTION key while the machine boots.
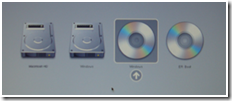
- When the Boot Picker screen appears, select the CD ROM icon labelled Windows and wait while the Windows Boot Manager loads (do not select EFI Boot).
- When prompted press a key to boot from the DVD and wait while the Windows Installer loads.
- On the Install Windows page, select the Language and Regional Settings you need and click Next followed by Install now.
- Enter your license key and click Next.
- Check the I accept the license terms check box and click Next.
- Click the Custom (advanced) button.
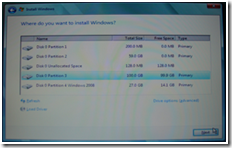
- On the Where do you want to Install Windows page select the 100Gb Partition (Disk 0 Partition 3) and click Next.
- Wait while Windows is installed. After approximately twelve minutes Windows will restart. Hold down the ALT/OPTION key while the machine boots.
- When the Boot Picker screen appears, select the Hard Disk icon labelled Windows and wait while the Windows Boot Manager loads.
- When the Windows Boot Manager loads, select Microsoft Windows Vista, press Enter and wait while the Windows Installer loads.
- The Installing Windows page will re-appear at the stage, Completing installation. After approximately five minutes Windows will restart. Hold down the ALT/OPTION key while the machine boots.
- When the Boot Picker screen appears, select the Hard Disk icon labelled Windows and wait while the Windows Boot Manager loads.
- When the Windows Boot Manager loads, select Microsoft Windows Vista, press Enter and wait while Windows loads.
- When the Choose a username and picture page appears, enter a user name and password and click Next.
- On the Type a computer name and choose a desktop background page enter a computer name and click Next.
- On the Help protect Windows automatically click the Use recommended settings button.
- Set your Time Zone, Date and Time and click Next.
- On the Thank You page, click Start and wait while Windows performs a performance evaluation.
- Logon to Windows.
- When the Desktop appears close the Welcome Center Window.
- From the Start Menu, choose Computer.
- Select the DVD Drive and click the Eject button.
- Insert the Mac OS Install Disk 1 (or your Boot Camp Drivers Disk) into your Mac.
- When the AutoPlay window appears, click Run setup.exe.
- When the User Account Control dialog appears, click Continue.
If a Windows Installer Internet Download Bootstrap has stopped working dialog appears click Close the program.
- On the Welcome to the Boot Camp installer page, click Next.
- Select the I accept the terms in the license agreement radio button and click Next.
- On the Choose additional features and settings page, ensure the Apple Software Update for Windows check box is checked and click Install.
- Wait while Boot Camp and Drivers are installed.
- On the Boot Camp installer completed page click Finish and then Yes to restart the computer.
- Hold down the ALT/OPTION key while the machine boots.
- When the Boot Picker screen appears, select the Hard Disk icon labelled Windows and wait while the Windows Boot Manager loads.
- When the Windows Boot Manager loads, select Microsoft Windows Vista, press Enter and wait while Windows loads.
- Logon to Windows. Notice that all the drivers are loaded and the screen resolution is set to something a little more sensible. The Boot Camp help file will also load and the Boot Camp Control Panel icon is displayed in the system tray.
- Eject the Mac OS Install CD.
- Configure Boot Camp to Use the F1-F12 keys to control software features using the Boot Camp Control Panel.
- Configure Boot Camp to use the Windows disk as its Start Up disk.
- Rename the C:\ drive to Windows Vista.
At this stage the Windows Vista installation is complete and you could choose to install your other apps, run Windows Update or restore from a backup your data etc. For the purposes of brevity we won’t bother at this stage.
Continue to Additional Tips & Tricks