Print | posted on Friday, November 28, 2008 4:35 PM
A while back I posted my popular article series, Triple Boot MacBook Pro, which described the steps necessary to configure a three-way system running Mac OS, Windows Vista x64 and Windows Server 2008 x64.
At the time it was unfortunately not possible make use of VMWare Fusion’s killer feature – running a VM directly from the Boot Camp partition (no VHDs). This was due to a couple of “issues”, which have thankfully now been addressed by VMWare.
This article explains the issues and details the remaining tweaks necessary to run the Vista partition under VMWare Fusion for a triple boot system.
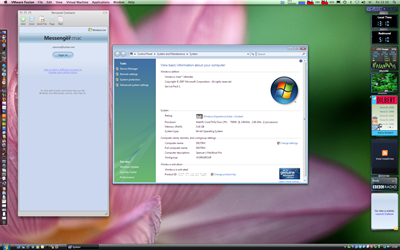
First up, here’s some eye candy of it up and running (click the images to view full size):
Vista x64 running in Fusion Unity:
Vista x64 running in Fusion:
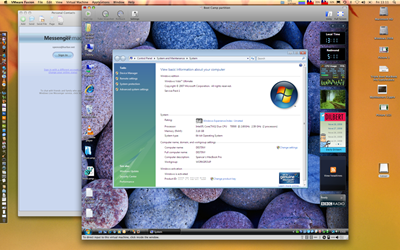
You might be thinking, ‘So What the Fuss?’. But these two problems were stopping me from spending as much time in Mac OS as I would have liked. There’s just so many apps that you just can’t get on Mac OS (like a decent blog client for example, what is up with that, not very Web 2.0 is it? come apple, get it together). Now I can run my Vista partition in Boot Camp, I’m able to for the most part boot in Mac OS and that makes me pretty happy.
Part One: The Issues
Support for Vista x64 and activation under Fusion
Firstly Fusion 1.0 (and betas of 2.0) did not support an x64 Boot Camp partition. Although there was an easy fix for this by editing the VMX file, the real pain was that these releases couldn’t handle activation of Windows or Office. Every time you booted Windows (either in Fusion or natively) you would need to activate Windows and Office. Not good!
Thankfully, with the current release of Fusion (2.0 ((116369)), these problems go away. A fair few folk posted to the forums over at the excellent communities.vmware.com about them, and the guys making this software happen are really on the ball. Props to the Fusion team for their approach.
Windows Boot Loader & Fusion expected partition
The second “issue” was all about the Windows Boot loader. Fusion’s Boot Camp support is designed to support a single Windows partition, and of course in the triple boot scenario we have two. Fusion also expects the Windows partition to have certain characteristics – those that are only present if you have gone through the Boot Camp Assistant in Mac OS to prepare the Windows partition. Of course, in our triple boot scenario, we never run Boot Camp Assistant.
When you load up a Boot Camp partition under Fusion, you are asked for your password and Fusion “locks” that partition – you will notice the disk icon on the desktop disappears. If you have followed the original article series, the Windows Boot Loader files will be on the Windows 2008 partition, so whilst you could open the Boot Camp Partition in Fusion, Windows can’t find the boot loader to continue.
The simple solution here is to simply change the order in which you install the two Windows partitions, and install Windows Vista first. By doing this, the boot loader files will be on the Windows Vista partition. This allows the partition to be opened by Fusion and for Vista to boot. Of course if you would rather use the Fusion Boot Camp support to run Windows Server 2008, you should install this OS first – but remember it must be on the second partition for Fusion to recognize it.
I am hoping that in the future the Fusion dudes will add support for using multiple partitions in this manner – and I have experimented a little with hacks to make this work, however the boot loader issue will still exist. It’s also worth noting this is an edge case, so I wouldn’t imagine they would consider it a worthwhile investment of time over other feature requests!
Part Two: Getting it working in a triple boot scenario
OK, so we have what we need to run the Vista partition under Fusion, but our partition is not a Boot Camp one, so there are some other tweaks to make it all happy.
I deliberately walk through these tweaks below to explain the issues. However this is not the optimal order in which to apply them. For the optimal order please go to Part Three, towards the end of the article.
Fusion expected Partition upon guest creation
The first problem is that Fusion doesn’t like our partition, it wasn’t created by Boot Camp after all, so we will get a Boot Camp preprocessing failed error when we try and open the VM or configure it’s settings.
- Within Fusion, open the Virtual Machine Library.
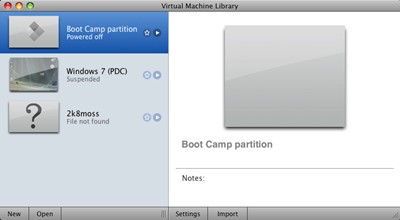
- Select the Boot Camp partition and click Settings. The error comes up.

- Click OK. The VM Settings will be displayed.
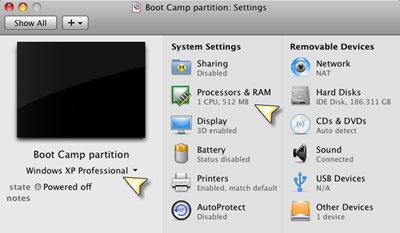
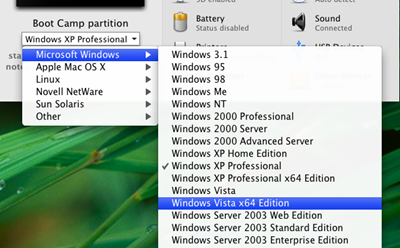
- Notice that Fusion is confused and thinks our VM is running XP.
- Select the combo box and change to Windows Vista x64, click Change when prompted.
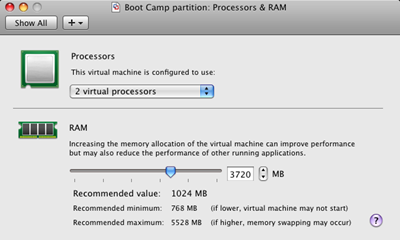
- The default RAM is 512Mb, and Vista needs a little more than that (!) so click Processors and RAM to set it to something more sensible. You can also use both cores if you wish.
- Close the Settings window.
- Start up the guest and enter your password when prompted.
- Vista will boot (eventually).
Ouch! No Keyboard!
However you may have a small problem at the logon screen. On my machines I could use the mouse, but not the keyboard and therefore was unable to logon! Not much use. Luckily there is a registry hack for this, which needs to be applied when you are in native Vista.
Registry hack for fixing keyboard under VMWare Fusion
Installing VMWare Tools & Network Driver
Assuming you have done the registry hack under native Vista, and can logon, Windows will start moaning about missing device drivers for new hardware devices.
- On the Found New Hardware dialogs, click Ask me again later. Keep clicking that option until the dialogs go away.
- From the Virtual Machine menu in Fusion, choose Install VMWare Tools.
- From the guest, open up the VMWare Tools disk and run setup, don’t forget to use the 64 bit one!
- Once the tools are installed and you have rebooted the guest and logged in you will get another Found New Hardware prompt: Windows needs to install driver software for your Ethernet Controller. Click Ask me again later.
This is because the preprocessing failed earlier, and we need to tweak the VMX file to add the necessary NIC.
- Shut down the guest
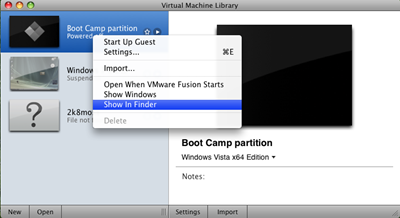
- From the Virtual Machine library, right click the Boot Camp Partition and click Show in Finder, this will display the VM files in a new window.
- Quit VMWare Fusion.
- In the Finder window right click Boot Camp partition and click Show Package Contents.
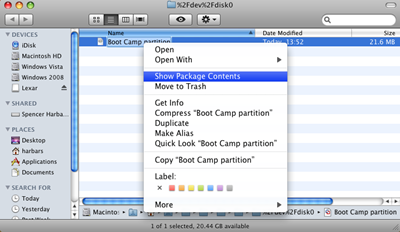
- Right click Boot Camp Partition.vmx and click Open With, followed by Other.
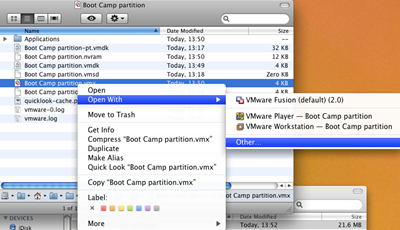
- In the search box type textedit, select TextEdit from the Results pane and click Open.
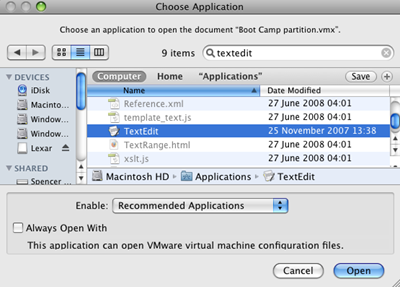
- In TextEdit, scroll to the end of the file and add the following line:
ethernet0.virtualDev = "e1000".
- Save the file and close Text Edit. Close the two Finder windows.
- Start VMWare Fusion and start the Boot Camp Partition guest.
We are golden! Once we log in we have network you can activate Windows and Office and we are done!! This is the last time you need to Activate. You can use Device Manager to verify there are no other missing device drivers.
Aero glass
Aero running under Fusion doesn’t work as the virtualised graphic card is not capable of supporting the advanced features needed. Don’t bother trying to make it work, it doesn’t.
Part Three: The Optimal Order
The best order to apply the tweaks above is as follows.
- Apply the registry hack whilst in Vista natively.
- Use Fusion’s Virtual Machine Library to create the Boot Camp Partition guest, by clicking Settings, but do not start it, also change the RAM etc here.
- Edit the VMX file to add the Ethernet controller.
- Boot up the guest and install VMWare Tools
Part Four: Conclusion
It’s awesome! No doubt about it. Enjoy your triple boot Mac with Vista under Fusion capability. Below are some references to the source of the tweaks detailed in this article.