Print | posted on Wednesday, July 31, 2013 5:10 AM
Introduction
In the previous parts of this article we covered the core concepts along with high availability, certificate and SharePoint considerations for Workflow Manager Farms, and the end to end configuration using Auto Generated Certificates. If you are not familiar with this material, make sure to read it before continuing as I assume you have done so!
This part will cover switching the existing Workflow Manager farm to using Domain CA issued certificates.
Whilst this part is intended as primarily step by step configuration guidance, I will take the opportunity to also explain a few things which didn’t make sense to cover in part one, particularly in the realm of Domain CA issued certificates.
As we are taking the environment from the end of part two and changing it up to make use of Domain CA issued certificates, it’s essential you are familiar with the sample scenario environment and configuration detailed in part two! This part is also useful to demonstrate the tasks necessary when updating the Workflow Manager (and Service Bus) configuration.
For this example, we will use a single certificate:
- a Server Authentication certificate for the Service Bus Farm and Encryption certificates and the Workflow Manager Services SSL and Encryption certificates
We will enrol this certificate using our Domain certificate authority.
Whilst you have the ability to use different certificates for each Workflow Manager and Service Bus certificate, there is little value in doing so. However, the steps below will provide all the information you need to configure multiple certificates should you need them. Watch out for the Outbound Signing certificate, as we cannot change from an auto-generated Outbound Signing certificate to a CA issued Outbound Signing Certificate. This is a significant constraint of Workflow Manager configuration, even though we can update the certificate, workflows will get “stuck” in their initial stage after doing so, as the Workflow Manager farm thinks it’s an auto-generated certificate! If your organisational policy dictates that only CA issued certificates should be used, then you must initially create the Workflow Manager farm with the correct certificates, as detailed in part four.
If you are not familiar with the different types of certificates in play, go back and read part one!
Let’s get started!
Certificate Enrolment
Regardless of whether we are updating an existing Workflow Manager farm or creating a new one, in order to make use of Domain CA issued certificates for our farm, we need to enrol them. In plain English, request them from the Certificate Authority. If the certificate we needed was a plain old web server certificate, this is very easy to do using Internet Information Services Manager. However, as detailed in part one, it’s essential that we use a certificate which also includes Subject Alternative Name (SAN) attribute(s). This is not something we can do using IIS Manager.
When using auto generated certificates this isn’t an issue, as the Workflow Manager Configuration Wizard takes care of this for us, and indeed allows us to use any machine in our DNS domain to be a Workflow Manager host. When making use of our existing Domain CA, we need to do a few extra steps to ensure we have and can enrol the right certificate.
As we cannot use IIS Manager and we cannot use the Computer Certificate Template, as this will have it’s attributes auto-generated, the first thing we need to do is to make the Web Server Certificate Template available for enrolment on one of our Workflow Manager machines. By default this is not the case with a Windows Domain CA.
On the machine hosting our Certificate Authority, FABDC1, perform the following steps:
- Launch Certification Authority
- Expand the CA (fabrikam-FABDC1-CA) node
- Right click on Certificate Templates and click Manage
- In the Certificate Templates Console, within the Templates list, right click Web Server and click Properties

- On the Web Server Properties dialog, click the Security tab
- Click Add…
- Click Object Types…
- Check the Computers check box, and click OK
- Enter FABWFM1 in the Enter object names to select text box and click OK
- Check the Enroll Allow check box, and click OK
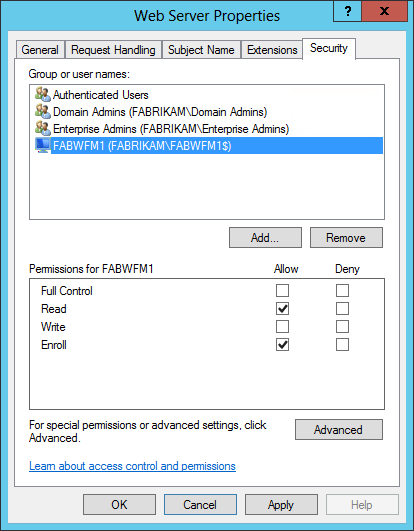
This allows us to request a Web Server certificate from the Certificates MMC snap in on FABWFM1 in the next step. Once we are done, we can go ahead and revert this security configuration if we wish to.
Next up, we enrol a certificate on on of the Workflow Manager hosts, perform the following steps on FABWFM1:
- Launch MMC.exe
- From the File menu, click Add/Remove Snap-in…
- From the Available Snap-ins grid view, select Certificates and click Add >
- On the Certificates snap-in dialog, select the Computer account radio button and click Next
- Click Finish and OK
- Expand the Certificates (Local Computer) node
- Right click on Personal, click All Tasks, and click Request New Certificate…
- On the Before You Begin page, click Next
- On the Select Certificate Enrollment Policy page, click Next
- On the Request Certificates page, check the Web Server check box, and click the “Click here to configure settings.” hyperlink
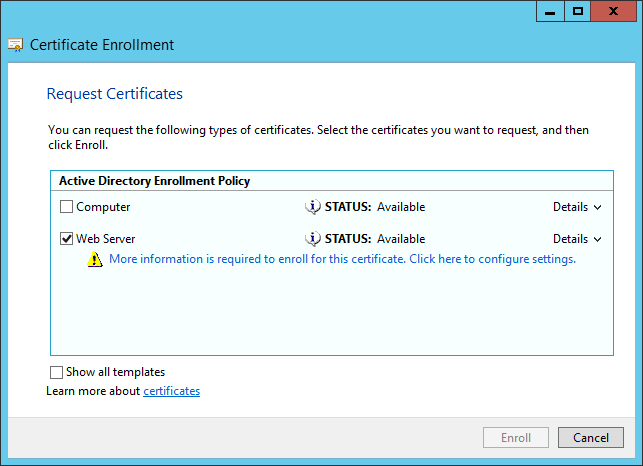
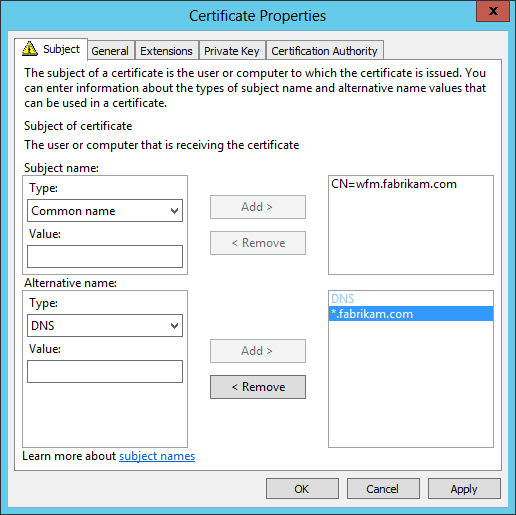
- In the Subject tab of the Certificate Properties dialog
- In the Subject name area, select Common Name in the Type combo box
- Enter a Value of wfm.fabrikam.com, and click the Add > button
- In the Alternative name area, select DNS in the Type combo box
- Enter a Value of *.fabrikam.com, and click the Add > button
- Ensure your settings exactly match the below screenshot before proceeding
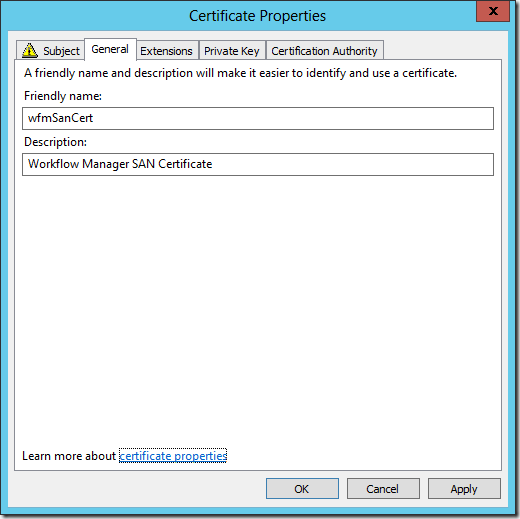
- Click the General tab
- Enter a Friendly name of wfmSanCert
- Enter a Description of Workflow Manager SAN Certificate
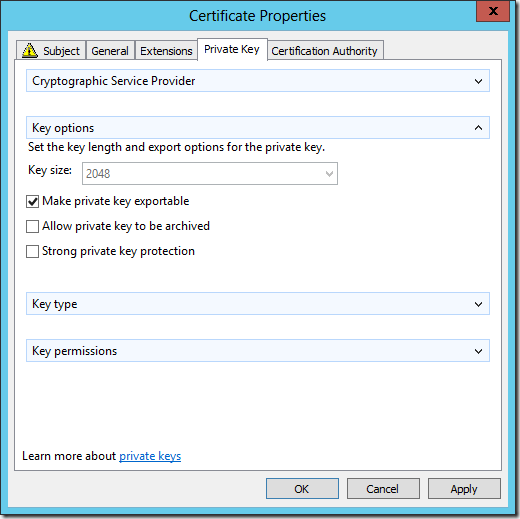
- Click the Private Key tab
- Expand the Key options area by clicking the down arrow icon to the right, and check the Make private key exportable check box
- Click OK
- Click Enroll to create the certificate, followed by Finish
- Note that the new certificate will be displayed in the Personal\Certificates store for the Local Computer
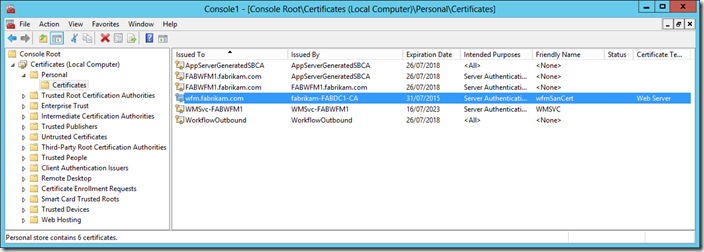
Note that in the above steps above, we might choose to enter multiple values of fabwfm1.fabrikam.com, fabwfm2.fabrikam.com, fabwfm3.fabrikam.com and wfm.fabrikam.com for an Alternative name. This would in principal allow us to be more prescriptive regarding membership of the Workflow Manager farm. However this will not work with SharePoint 2013. Thus the DNS=*.fabrikam.com alternate name is an absolute hard requirement.
Exporting and Importing the Certificate
The next step is to export and import the cert to the two other machines in the Workflow Manager farm. When working with auto generated certificates the Workflow Manager Configuration Wizard deals with this for us. Unfortunately when working with other types of certificates we need to take care of it, it’s simple to achieve using the Certificates MMC Snap-in. Basically you export the certificate with it’s private key to a file, and then import that on the other two machines. We can also achieve the same end result with the following Windows PowerShell.
Execute the following Windows PowerShell on FABWFM1, to export the certificate to a file. You will be prompted to enter a password used to protect the certificate file:
$filePath = "c:\wfmSanCert.pfx"
$friendlyName = "wfmSanCert"
$cert = dir Cert:\LocalMachine\My | ? {$_.FriendlyName -eq $friendlyName}
$password = Read-Host "Certificate Password: " -AsSecureString

Export-PfxCertificate -Cert $cert -Password $password -FilePath $filePath
Execute the following Windows PowerShell on FABWFM2 and FABWFM3 to import the certificate. You will need to enter the same password you entered in the step above:
$filePath = "\\fabwfm1\c$\wfmSanCert.pfx"
$password = Read-Host "Certificate Password: " -AsSecureString

Import-PfxCertificate -Password $password -FilePath $filePath -CertStoreLocation "cert:\localMachine\my"
You will note the output of the above includes the Thumbprint on the certificate we have just imported:
    Directory: Microsoft.PowerShell.Security\Certificate::LocalMachine\my


Thumbprint                                Subject
----------                                -------
48CA6151A045D81757F8CF9EFE320A0115E69DCF  CN=wfm.fabrikam.com
You will also be able to view the certificate in the Certificates MMC Snap-in or indeed IIS Manager on both FABWFM2 and FABWFM3.
Reconfiguring Service Bus and Workflow Manager to use the new certificate
Now we have our certificate available on all three machines in the farm(s). We can tell Service Bus and Workflow Manager to use it. The basic pattern when modifying properties of Service Bus is to:
- Stop the farm
- Make the changes
- Update each host in turn (propagates the changes made in Step 2)
- Start the farm
For Workflow Manager the pattern is slightly different:
- Make the changes
- Stop each host
- Update each host (propagates the changes made in Step 1)
- Start each host
This “playbook” is extremely important. If you don’t follow the rules you can end up with a very broken environment with various service elements stuck in a “start pending” state. Whilst it’s often possible to get back into a good configuration it’s a lot better to never get into trouble in the first place :). So follow the playbook, always!
Updating Service Bus
We will first update Service Bus to use the new certificate. Remember the certificate thumbprint we saw earlier? That’s the key element we will need to update the configuration. In this example we are making use of the friendly name we gave the certificate, and this is something I recommend you do when working with certificates in general, unless you are exceptionally good at memorising GUIDs!
Execute the following Windows PowerShell on FABWFM1:
# load up the Service Bus PoSh
Import-Module ServiceBus

# grab the certificate based on it's friendly name
$friendlyName = "wfmSanCert"
$cert = dir Cert:\LocalMachine\My | ? {$_.FriendlyName -eq $friendlyName}

# configure the certificates
Set-SBCertificate -FarmCertificateThumbprint $cert.Thumbprint -EncryptionCertificateThumbprint $cert.Thumbprint

# stop the service bus farm
Stop-SBFarm -Verbose

# update the service bus host(s)
Update-SBHost
Now execute the following Windows PowerShell on FABWFM2 and FABWFM3:
Import-Module ServiceBus

# update the service bus host
Update-SBHost
Once the Update-SBHost cmdlet has completed on all servers in the farm, we can re-start the farm. Run the following Windows PowerShell on FABWFM1:
Start-SBFarm
Which will start up all the necessary services across the farm. This will take a few minutes to complete. If we run the Get-SBFarm and Get-SBFarmStatus cmdlets, we will see the following output:
Get-SBFarm
Get-SBFarmStatus


FarmType                      : SB
SBFarmDBConnectionString      : Data Source=SQLWFM;Initial Catalog=SbManagementDB;Integrated Security=True;Encrypt=False
ClusterConnectionEndpointPort : 9000
ClientConnectionEndpointPort  : 9001
LeaseDriverEndpointPort       : 9002
ServiceConnectionEndpointPort : 9003
RunAsAccount                  : wfm@fabrikam.com
AdminGroup                    : BUILTIN\Administrators
GatewayDBConnectionString     : Data Source=SQLWFM;Initial Catalog=SbGatewayDatabase;Integrated Security=True;Encrypt=False
HttpsPort                     : 9355
TcpPort                       : 9354
MessageBrokerPort             : 9356
FarmCertificate               : Thumbprint: 48CA6151A045D81757F8CF9EFE320A0115E69DCF, IsGenerated: False
EncryptionCertificate         : Thumbprint: 48CA6151A045D81757F8CF9EFE320A0115E69DCF, IsGenerated: False
Hosts                         : {Name: FABWFM1.fabrikam.com, Configuration State: HostConfigurationCompleted, Name: FABWFM2.fabrikam.com, Configuration State: HostConfigurationCompleted, Name:
                                FABWFM3.fabrikam.com, Configuration State: HostConfigurationCompleted}

HostId      : 1
HostName    : FABWFM1.fabrikam.com
ServiceName : Service Bus Gateway
Status      : Running

HostId      : 1
HostName    : FABWFM1.fabrikam.com
ServiceName : Service Bus Message Broker
Status      : Running

HostId      : 1
HostName    : FABWFM1.fabrikam.com
ServiceName : FabricHostSvc
Status      : Running

HostId      : 2
HostName    : FABWFM2.fabrikam.com
ServiceName : Service Bus Gateway
Status      : Running

HostId      : 2
HostName    : FABWFM2.fabrikam.com
ServiceName : Service Bus Message Broker
Status      : Running

HostId      : 2
HostName    : FABWFM2.fabrikam.com
ServiceName : FabricHostSvc
Status      : Running

HostId      : 3
HostName    : FABWFM3.fabrikam.com
ServiceName : Service Bus Gateway
Status      : Running

HostId      : 3
HostName    : FABWFM3.fabrikam.com
ServiceName : Service Bus Message Broker
Status      : Running

HostId      : 3
HostName    : FABWFM3.fabrikam.com
ServiceName : FabricHostSvc
Status      : Running
Note the certificate thumbprint returned from Get-SBFarm. If we have certificate related issues, they will be reporting in the status for each of the farm components, when we run Get-SBFarmStatus.
Updating Workflow Manager
Now our Service Bus farm is using the new certificate, lets go ahead and change the Workflow Manager certificate. Execute the following Windows PowerShell on FABWFM1:
# load up the Workflow Manager PoSh
Import-Module WorkflowManager

# grab the certificate based on it's friendly name
$friendlyName = "wfmSanCert"
$cert = dir Cert:\LocalMachine\My | ? {$_.FriendlyName -eq $friendlyName}

# configure the certificates
Set-WFCertificate -SslCertificateThumbprint $cert.Thumbprint -EncryptionCertificateThumbprint $cert.Thumbprint

# stop the workflow host
Stop-WFHost -Verbose

# update the workflow host(s)
Update-WFHost

# re-start the workflow host
Start-WFHost
Then execute the following Windows PowerShell on FABWFM2 and FABWFM3:
# load up the Workflow Manager PoSh
Import-Module WorkflowManager

# stop the workflow host
Stop-WFHost -Verbose

# update the workflow host(s)
Update-WFHost

# re-start the workflow host
Start-WFHost
Again, this will take a few moments to complete on each host. Once it is done we can use Get-WFFarm and Get-WFFarmStatus to see the following output:
Get-WFFarm
Get-WFFarmStatus


FarmType                   : Workflow
WFFarmDBConnectionString   : Data Source=SQLWFM;Initial Catalog=WFManagementDB;Integrated Security=True;Encrypt=False
RunAsAccount               : wfm@fabrikam.com
AdminGroup                 : BUILTIN\Administrators
Hosts                      : {Name: FABWFM1.fabrikam.com, Configuration State: HostConfigurationCompleted, Name: FABWFM2.fabrikam.com, Configuration State: HostConfigurationCompleted,
                             Name: FABWFM3.fabrikam.com, Configuration State: HostConfigurationCompleted}
InstanceDBConnectionString : Data Source=SQLWFM;Initial Catalog=WFInstanceManagementDB;Integrated Security=True;Asynchronous Processing=True;Encrypt=False
ResourceDBConnectionString : Data Source=SQLWFM;Initial Catalog=WFResourceManagementDB;Integrated Security=True;Asynchronous Processing=True;Encrypt=False
HttpPort                   : 12291
HttpsPort                  : 12290
OutboundCertificate        : Thumbprint: 53C96B64BAFC637A885F4BB4D0CB6ECB0F593680, IsGenerated: True
Endpoints                  : {https://FABWFM1.fabrikam.com:12290/, https://FABWFM2.fabrikam.com:12290/, https://FABWFM3.fabrikam.com:12290/}
SslCertificate             : Thumbprint: 48CA6151A045D81757F8CF9EFE320A0115E69DCF, IsGenerated: False
EncryptionCertificate      : Thumbprint: 48CA6151A045D81757F8CF9EFE320A0115E69DCF, IsGenerated: False

HostName      : FABWFM1.fabrikam.com
ServiceName   : WorkflowServiceBackend
ServiceStatus : Running

HostName      : FABWFM1.fabrikam.com
ServiceName   : WorkflowServiceFrontEnd
ServiceStatus : Running

HostName      : FABWFM2.fabrikam.com
ServiceName   : WorkflowServiceBackend
ServiceStatus : Running

HostName      : FABWFM2.fabrikam.com
ServiceName   : WorkflowServiceFrontEnd
ServiceStatus : Running

HostName      : FABWFM3.fabrikam.com
ServiceName   : WorkflowServiceBackend
ServiceStatus : Running

HostName      : FABWFM3.fabrikam.com
ServiceName   : WorkflowServiceFrontEnd
ServiceStatus : Running
Similarly to Service Bus, we can see the thumbprint and the status of the components of the farm. If there are any SSL issues, they will be reported in the ServiceStatus.
We are done on the Workflow Manager side of things! Phew! It’s pretty straightforward, if we remember to follow the playbook! Seriously, don’t attempt to shortcut things here, or do it “smarter”. That will just end up meaning you have to unpick a bad configuration to get it all happy before then needed to follow the playbook the way you should have done the first time around! I’ve seen far too many busted customer Service Bus or Workflow manager farms due to not considering this playbook, which is admittedly pretty hidden away over on MSDN!
Re-configuring the SharePoint Workflow Service Connection
We now have a happy Workflow Manager farm using the certificate of our liking, what about the SharePoint side of the house? Well, in remarkable fashion for SharePoint - even though it’s not actually anything to do with SharePoint – it just works! Yup, that’s right! We don’t need to do anything.
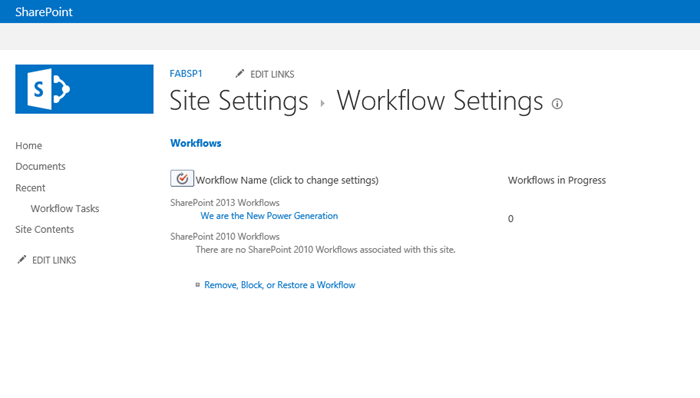
If you remember we created our connection initially using the address https://wfm.fabrikam.com and that address hasn’t changed. All we’ve done is update the certificate used by this “endpoint”. As this certificate is issued by our Domain CA, we don’t have to import into SharePoint’s certificate store. Everything is golden. We can go ahead and publish a Workflow using SharePoint Designer:
You may find that you need to perform an IISRESET if you attempt to kick off a workflow immediately after restarting the Workflow Manager hosts. Otherwise you may see errors related to the collection of workflows. This is NOT required, but if you are impatient and want to see the immediate effect, as always with SharePoint, IISREST is your friend.
The only thing left really is to tidy up the old auto-generated certificate in the SharePoint store, which we can remove by executing the following Windows PowerShell:
$tra = "Workflow Manager Farm"
Get-SPTrustedRootAuthority | ? {$_.Name -eq $tra} | Remove-SPTrustedRootAuthority -Confirm:$false
And that’s it!
Conclusion
In this part, we’ve taken an existing Workflow Manager farm using auto-generated certificates, and changed it to one which makes use of a Domain CA issued certificate.
In the final part of this article, we’ll walk through the steps end to end for creating a Workflow Manager farm using Domain CA certificates and NLB. Whilst there is a lot of redundancy in the last part (we enrol the certs, and use them when creating the Workflow Manager farm) there are some key differences and it’s been frequently asked for. As such, for the sake of completeness, I will include it.
Rock on SharePoint 2013 Workflows!